VFX Artist and Rampant Design CEO Sean Mullen shows us how to add real gun effects to your action scene in Adobe After Effects.
How to Add Real Gun Effects to Your Action Scene in Adobe After Effects from Rampant Design Tools on Vimeo.
Sign Up for Our Newsletter and Grab Your Free 4K Effects Today:
[toggle title=”Video Transcription”]How to Add Real Gun Effects to Your Action Scene in Adobe After Effects
All you have to do is:
Sean Mullen: “Hey, hey, everybody, I’m Sean Mullen from rampantdesigntools.com, and today I’m going to show you how you can add real gun effects to your action scenes in Adobe After Effects. That’s right, I said real gun effects. We’re not hand-creating muzzle flashes here. These are muzzle flashes that we shot in a controlled environment with pros, and it’s all kinds of great muzzle flashes, but you’re thinking, well, are you asking me to buy something? The answer is no. Go ahead and go to 4kfree.com, that’s the number four the letter K, free.com. Sign up like this, badada, [inaudible 00:00:31], and scroll all the way down past all these wonderful free 4k effects and click on gun effects. These are the effects we’re using in this tutorial. We never make you buy anything or ask you to buy anything, when you’re following along. You could use these in your work. They’re not watermarked or anything.
”
”
[00:01:00]” “Go make some action sequences right now. Make them and then show them to us. We’d love to see them. If you want to buy more muzzle flashes, thank you. Thank you for your support. Go to rampantdesigntools.com and click on visual effects under style effects and you can grab our gun effects. I believe right now they’re 50% off or something like that, but not asking anyone to buy anything. We never do. For those of you who buy, thank you for your support. It keeps us going. For those of you who don’t, it’s all good. We love each and every one of you, so we want everyone to be able to use these cool effects.
”
“All right, so now you’ve gone to 4kfree and you’ve downloaded these cool muzzle flashes. I’m going to show you how to use them. Let’s go to a comp right now that’s just the shot. It’s just got our action plate here. All right, so I’m going to go ahead and just play this. Obviously we need to first figure out where we want to put the muzzle, so I’m going to scroll through here. This looks pretty good. All right, so I’m going to drag the marker over here to my frame. That way I know where I want to put my muzzle flash and it’s a great frame of reference. I don’t have to keep finding it every time or figuring out where it was if I have to leave the shot for a second or whatever. It’s always good to put the marker down.
”
”
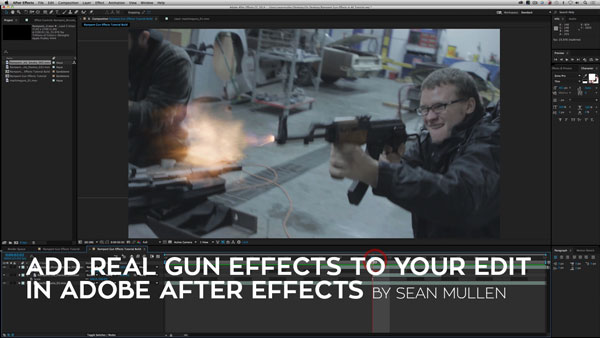
[00:02:00]” “All right, so next thing, obviously, we need a muzzle flash. Let’s go over to our project window and I’m bringing over a muzzle flash from our 4kfree library, and I’m dragging it onto our timeline. Now the muzzle flash starts at the very first frame of the clip, so let’s just drag it to where our marker is right here, and boom, you see this muzzle flash. It’s nice and big, and unfortunately it’s coming out of his forehead. We don’t want that. First thing, let’s go ahead and take the anchor point of the muzzle flash and put it at the beginning of the flash just for organizational sake. It’s somewhere over there. Cool. See, so now if I hit P or S, for scaling or position, it’ll scale or reposition from that anchor point. It just makes things easier to do. You don’t have to do it, but it’s just easier. Right?
”
”
[00:03:00]” “If you feel like hitting P and dragging the position, you can do that, or you can just go ahead and use your mouse and we can drag it right on top of the barrel. Of course, you can shrink it or you can scale it and it’s coming straight from the barrel. Wah, see? Obviously I’m going to leave it like this. I like that. If we roll it back, we have the makings of a muzzle flash. Now, for me, for everything I do in my life, I love to blend. I’m a blender. I’ll put it in the blender, no matter what. You don’t have to. We offer these without the channels, just like you see, so you don’t need to blend, but I love to. Let’s go over here to where it says, “Mode,” and switch it from normal and change it to screen. See, to me, that looks a lot better, but this is a complete stylistic choice. You do your thing. I do mine.
”
“If we roll back, cool. Now it’s starting to happen, starting to look good. I basically do two more effects when I’m doing gun effect shot. I do two more effects to help support this effect right here. We’ve got this big ball of light and we’ve got this explosion, what do we do? How do we help sell an explosion? Let’s add some smoke, because where there’s fire, there’s typically smoke. Let’s go ahead and grab real muzzle smoke and drag it into the timeline, like so. As you can see, it is massive, I mean, just massive. All right, so this is the … I’m going to dial this back a little bit. Obviously this is not a rocket launcher or a missile launcher, so let’s go ahead and scale it down just a little bit. We’ll go ahead and do the same anchor point thing like we did before. The anchor point’s over here in the clip, just move it all the way over here, like so. That way it shrinks to where I kind of want it to be.
”
[00:04:00] “Now let’s go ahead and put it right there, over the muzzle. Cool. Now obviously the smoke should not come before the flash. That’s weird, so let’s dial it back. That’s pretty cool. Right? So far, so good. Now, a couple things, the smoke is a little too prominent. All right? Let’s go ahead and blend it, like I like to say, I blend everything. See? Now you can see it looks a little bit better there. That’s cool, but it’s still too prominent. Right? It’s too much. The focus is being drawn to the smoke. We don’t want that. Go ahead and hit the T key and drop your opacity from 100, maybe 50, let’s do 50%. Dial it back. Looking better, looking better.
”
”
[00:05:00]” “Now, when you’re working with these elements, they’re super high resolution, so they’re sharp. Right? It looks like there’s a lot of motion blur in this scene, so maybe these elements are a little too sharp for the scene, especially the smoke here. Let’s go ahead and add a little bit of a blur, fast blur. Let’s just dial it down, I don’t know, let’s do 10. There you go. Just desharpening it a little bit. You know? Cool. Looking good. You could add more blur. You could add less blur. You could take the blur away, I should say. Add less blur, who adds less blur? That’s crazy. All right. Again, this is all stylistic, so you put in the amount that you want to make the shot work for you and work for your client or your director. Boom.
”
”
[00:06:00]” “We’re getting close, we’re getting close, almost done. There’s only one more thing that I typically do when I’m doing a gun effect shot. We’ve got an explosion. We’ve got our smoke. That’s great, but we’re, like I said, before, emitting this giant ball of light here, right? Yet, nowhere else in the environment do you see any kind of light happening. If you fire a real gun, like we did when we got a bunch of references that we’re going to post online for people to see, you light up pretty much like Christmas day, Christmas morning. We got to add that. It helps all the effect. Go ahead and highlight your bottom layer right here and hit duplicate, like so. Double click on it and go to your pen tool, and just draw a nice little matte. Now this matte does not have to be accurate. It’s okay if you stay outside the lines, inside the lines. This is a garbage matte, so don’t spend a lot of time on it. Don’t freak out about it if you go outside the lines. It’s all to the good.
”
”
[00:07:00]” “We’ll just make this cool little matte all the way around our friend here. Like so, like so, like so, and close it up. Cool. Now you have this really weird looking matte, and you’re, like, “What am I doing with this?” Go back to our comp. Right now you can’t see anything because it’s … you’re masking on top of the same exact footage. We need to change our mode, our blend mode. Like I told you, I always blend, so change normal to screen. Let’s do screen and see what happens. See? Now check this out. This is this really weird, goofy looking shape, so go ahead and hit F for feather, and then just drag this out to taste. I never like to see matte lines, so I like to blend it and blend it and blend it, feather it, so you can’t see the origination of the matte. That’s cool so far.
”
“Now, if you go too far, if you’re matt’s, like … if you feather it and you’re like, “Oh, wait, it’s … the light’s going too far. I don’t like it,” hit M and hit M again, and go to mass expansion, and instead of expanding it out, which would happen if you move to the right, you’re going to shrink it down by holding it and moving it to the left. See? Ah, yeah, so there you go. Just shrink it down to taste and go ahead and highlight your layer again, hit T for opacity, and let’s go ahead and click on a key frame right there, turn on the stop watch, make a key frame. Right here at one, which is where our muzzle flash is happening, we want this to be 100%. Go ahead and hit page up, and take 100% and go to zero, because obviously nothing has happened. Go back to your first frame again, and then hit two more times down, using page down, and go take the 100 and go down to zero.
”
”
[00:08:00]” “What have I done? We go zero, 100, boom, boom, zero. Right? It’s this. Pow, pow, pow. Okay. We’re getting there. All right, a couple things. This is an orange glow. This dude is white, so we need to change that. Go ahead and highlight your reactive lighting layer, and go to effect, auto correction, tint. We’re going to ignore map black two and change map white two. Go ahead and select the eyedropper and find some kind of cool orangey look. Then click on the color again and then just dial it in to taste. Now it’s starting to make a little bit better sense. Right? Cool.
”
”
[00:09:00]” “Now it’s all about the finessing, right? Now your shot’s done. This effectively works. You’ve got a muzzle flash. You’ve got muzzle smoke. You’ve got the reactive lighting. These are my three principles to doing visual effects for gun shots. You could also take the time and add reactive lighting here or on the floor or on the dude’s arm, depending upon how big the shot is, and how you want to make things react. You know? This is where you start dialing things in, so you go back to your layer one where you’re … your marker one, excuse me, where the muzzle flash comes out, and you’ve got this guy, he’s almost as bright as the flash, so maybe you don’t want that to happen, so you go ahead and you just, make sure you’re on your key frame and just dial it down just a little bit. Let’s do 70. Right? Pull back.
”
“It’s all about tweaking. It’s all about how exaggerated or under exaggerated do you want? I mean, I’ve worked on some really surreal projects where they really want things to be over the top, so you’ll do that. It’s all depending upon what kind of message you want to convey to the viewer. There you go. That’s basically it. It’s really just three steps. First things first, I’m the realist. No. First things first, you put the muzzle flash on the frame after you find what frame you want the muzzle flash to happen. Then you blend it. I love to blend it.
”
”
[00:10:00]” “Secondly you put on smoke, which is real simple, right there. There’s our smoke. Remember him? Then, of course, you put your reactive lighting on. It’s real, real simple, just a few steps, and you’ve got yourself an instant real muzzle flash look on your shot using real muzzle flashes, real muzzle smoke. It always looks better, but these steps work the same if you make your own muzzle flashes or you get muzzle flashes from somebody else. Just go crazy. If you do make something, send it. Send us a link. We love to see the work that you all do. We also share it. We tweet it and we post it on our Facebook pages and our groups pages and so, yeah, that’s about it. It’s real simple. Thanks for watching.
”
“Go to 4kfree.com, remember, grab as many effects as you want. They’re absolutely free. Please like and share and tell your friends about this tutorial, about all of our other tutorials, and we just can’t thank you all enough. You guys are the reason why we’re around, and we thank you and love the community. We love each and every one of you, so that’s that. Until next time, I’m Sean Mullen from Rampant Design. Thanks for watching.
”
[/toggle]
