FCPX Trainer and Rampant Design CFO Stefanie Mullen shows us how to add real gun effects to your action scene in Apple Final Cut Pro X.
How to Add Real Gun Effects to Your Action Scene in Final Cut Pro X from Rampant Design Tools on Vimeo.
Sign Up for Our Newsletter and Grab Your Free 4K Effects Today:
[toggle title=”Video Transcription”]How to Add Real Gun Effects to Your Action Scene in Apple Final Cut Pro X
All you have to do is:
Stefanie Mullen: “Hi, Stefanie Mullen from RampantDesignTools.com, here to show you how to add real gun effects to your action scene in Final Cut Pro 10. Before we start, head on over to 4KFree.com and pick up some free gun effects for yourself. These effects are 100% free, all you have to do is sign up, scroll down and click on the gun effects to start the download. So easy, and if you’re interested in purchasing even more gun effects, head on over to RampantDesignTools.com and check out the complete gun effects library. These gun effects are amazing, and they are 100% real. Let’s go ahead and get started with our gun effect tutorial.
”
”
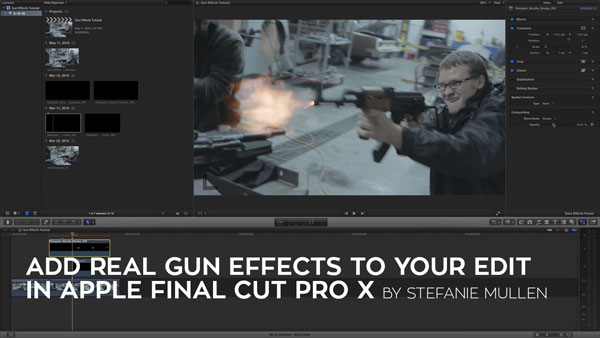
[00:01:00]” “All right, I have all of the free gun effects already imported, they’re right here. I’ve already done that, so let’s get started. I also already have some footage in my timeline right here, as you can see, and I’ve already gone ahead and put a marker here where I would like my muzzle flash to be. Find your muzzle flash point and put a marker there, this is going to help line up all of your effects in a second. First thing we need to do, let’s add the flash. I go up here, I’m going to grab my flash, and we’re using muzzle flash number 32, and I’m going to drag it down here and I want to place the beginning of the flash right at the mark that I’ve already made.
”
”
[00:02:00]” “Cool, now let’s work with the sizing. Let’s click on the clip, go over here to our inspector and we want to work with the position and scale, but I want to change the spacial conform from fit to none. I want to actually have this in the real space, so do that first and now we can actually move it. Let’s go ahead and move it down and then move it over, and I like to match up the explosion here with the gun barrel, so I’m just going to scale it down just a little bit and then we can move it back. That looks pretty good. If I scroll that through, perfect, we have our muzzle flash already. All right, now the next thing we’re going to do is we’re going to change the compositing mode. This comes with an alpha channel, so you could actually leave it like this, but I like to change to the blend mode, because it looks a little more natural, so I’m going to change it from normal to screen, that looks a little bit better. Now if I, that looks nice. All right, perfect.
”
”
[00:03:00]” “Now we’re going to go ahead and add a secondary effect, which is really important and kind of makes the whole effect, and that’s the smoke. I’m just going to grab smoke number 2, so if scroll through this you’ll see it, there it is. Let’s go ahead and grab that, and before I actually drag this down I want to actually skim this and I want find out where the smoke comes on frame, so right about there. I’m going to place a marker there, now we probably will have to move it when we put it on our timeline later, but that gives me a good starting place. There’s my marker, I’m going to place my marker here at the edge of my muzzle flash and the first thing I want to do again is I want the spacial conform from fit to none, so it’s the actual size, and there it is over there in the corner. Now we have to move it, so let’s go ahead and do that. As you can see, this is way, way, way too big, so let’s scale this down and then let’s move it back, and let’s see what that looks like.
”
”
[00:04:00]” “What I’m going to do is I’m going to turn off the flash layer, so I’m just going to press V, turn that off, and I’m going to shrink this up just a little bit so it matches our edit. Looks pretty good, it comes on, it’s probably coming on a little too fast, so we actually probably want it to be right here. Let’s put a mark there and let’s move this down, let’s see what this looks like. Then of course we need to adjust it again, so let’s actually move it back here and let’s roll that through. It’s just a little high still, it’s looking good, it’s in the right place, but let’s just take it down just a little bit. Let’s work on that Y, now let’s play it through. Okay, so now it looks like we have a smoke gun. Maybe it’s still a little high, so again let’s move that down just a little bit and play it through. All right, that looks right, looks like we’re blowing out some smoke there.
”
”
[00:05:00]” “Let’s go ahead and add our flash back, I think that looks about right. Now what I want to do, again, I want to change the smoke from with the alpha channel to a screed. It looks more natural, so let’s go ahead and roll that through, and the very last thing I want to do with my smoke is change the opacity, because right now it’s a little bit distracting for me, so then I’m going to come up here and I’m going to lower that down just a little bit. There we go, we have a convincing secondary effect on top of our muzzle flash. Perfect, it really definitely adds to it. Actually, I want to move this over just a little bit so it covers some of the gun. Yeah, that’s better. Perfect.
”
”
[00:06:00]” “All right, so we’ve got our muzzle flash and we’ve got our smoke. Now there’s actually one thing that we’re missing, and we need to actually add some reactive lighting so it appears there’s actually an explosion taking place in this environment. Right now it doesn’t look as convincing as it could be, so the way we’re going to that is we’re going to add a mask to this and add some reactive lighting. Let’s stop that. The first thing we want to do is we want to duplicate our video layer, all I do is hold down Option and drag up, that’s going to duplicate it for me and then we’re going to come here to this frame, the frame right at the muzzle flash, and I’m going to click this and I’m going to come over here to my effects panel. I’m going to scroll this down to Masks and I’m going to double click on Draw Mask, and it should have put it here, you’ll see it up here. Then all we’re going to do is we’re going to actually draw a mask around our guy here. This doesn’t have to be perfect, this is, it’s fine, we’re going to tweak it a little bit more.
”
“There’s our mask and to see this mask, since we can’t see it right now, let’s change the blend from normal to add. There we go, and if we turn off the little mask there you’ll see it. Perfect. All right, the next thing we’re going to is we don’t want these sharp lines, so let’s go ahead and feather it, feather it out a little bit and we’re going to take the fall off down just a little bit as well, and then if you need to come back in here, if you see that your mat’s gone a little bit feathered too much you can actually turn on this and then bring it in a little like that, and then you can tweak it with your points as you need it to be tweaked.
”
[00:07:00] “That looks pretty good to me, let’s turn that off. It looks like a good mat, it works, it’s got light on it, we can see the light. The next we need to do is we actually need to create use key frames to make this only occur when the explosion is here. That’s real simple to do, with your plate head here at the beginning of the muzzle flash, you’re going to push the arrow key one time back, that’s going to go skip to the next frame, and we’re going to go up here and we’re going to take this to zero and we’re going to make a key frame. Then we’re going to press to the right twice and we’re going to go back one, and we’re going to make this 100%, then we’re going to go one, two and we’re going to make this back to zero. Now if we scroll back and I roll this all the way back to the beginning, there we go, we have a little flash and a little reactive lighting happening on this body, which is perfect, what we want.
”
[00:08:00] “Now, what we don’t want is it to be white, because our muzzle flash is actually a little bit on the orange side, so let’s go ahead and stop that, let’s roll this back here. All we’re going to do is we need to add a tint color to this, so go over to your color and your effects panel, go down to tint, you can either double click it on there, and what you’re going to see is that now it’s purple, so we need to change that from purple to match this to be a little bit more orange. Let’s open that up, let’s find a color that we like. I like that, it looks pretty nice, and of course we want to dial that way back, and if you needed to you could actually go back and work with your points, but we don’t need to do that right now.
”
”
[00:09:00]” “We’re going to take this back, and then I actually also want to take the opacity down just a little bit. Just a little bit of a hint of that color, and then if we roll this back, there we go. Then of course you can keep playing with this, if it’s still a little too bright you can always take the opacity down just a little bit, even the amount down just a little bit, and then watch it again. There we go. Super easy, super simple. All you’ve got to do is place the muzzle flash in, put the smoke in there, and then add the reactive lighting. So easy, so simple and we’re done. We have successfully added gun effects and we didn’t even have to leave FCPX. I love that, it’s so great. If you’re interested in anymore tutorials and training, head on over to RampantDesignTools.com. Also, don’t forget to subscribe, like, and comment below. Again, I’m Stefanie Mullen with RampantDesignTools.com, thanks for watching, bye.
”
[/toggle]
