Use Impact Lights to Add Dynamic Effects to Your Edit in Adobe Premiere Pro
Visual Effects artist and Rampant Design Lead Creative Sean Mullen shows us how to use Impact Lights to add dynamic effects to your edit in Adobe Premiere Pro.
Use Impact Lights to Add Dynamic Effects to Your Edit in Adobe Premiere Pro from Rampant Design Tools on Vimeo.
Sign Up for Our Newsletter and Grab Your Free 4K Effects Today:
[toggle title=”Video Transcription”]Use Impact Lights to Add Dynamic Effects to Your Edit in Adobe Premiere Pro Video Transcription
All you have to do is:
Hey, party people, what’s crackin’? My name is Sean Mullen from rampantdesigntools.com. Today, I’m going to show you how to instantly and dramatically add punch to your video in Adobe Premiere Pro. How do we do that? Well, there’s this little product that I created, called Impact Lights. These are a 350 real 2K, 4K, and 5K hard hitting light effects. They’re not CG; they’re not generated in the bonks. I shot these in our studio, using the Red Epic camera. I basically created these effects for my friends who are editors, who are constantly being asked, “Hey, I need to punch this thing up. I need to add some stank to this.” It just depends on who your clients are. My corporate clients, are like, “Uh, could you add a little bit of flair here? Thirty percent more punch.” My non-corporate clients, are like, “Dude, I need you to drop some stank on this yesterday.”
I get a lot of phone calls to stylize video. It’s a huge percentage of my work for my editor friends, are to add extra punch to the video. I created these products, so they could do it themselves. Of course, it’s available to you as well. Why don’t you jump on over to rampantdesigntools.com, that’s my company. Scroll down here to Impact Lights, right here at the bottom. As you can see, like I said before, we offer these Impact Lights in 2K, 4K, and 5K. They’re really designed so you can drag and drop hard hitting effects onto your timeline. Now, if you have Impact Lights, thank you for supporting us, you’re my new BFF, as always. If you don’t, it’s okay too, because if you look in the description of this video, I’m giving you a handful of Impact Lights that you can use, for free, in 4K. You can check them out and see what you think.
Let’s jump into Premiere Pro. All right, now that we’re in Premiere Pro, before I get started, as always, I just want to let you know, that all of the effects that we create here at Rampant are QuickTime based. You don’t need Adobe Premiere Pro to use these. They work in all editors, all compositors, [00:02:00] any software that can read QuickTime, you can use our effects in. That means you can use them in Final Cut Pro, In Motion, After Effects, Nuke, Shake, Vegas. Whatever it is you use, our stuff works, as long as it can read a QuickTime movie. Premiere Pro is my favorite editor of choice, so I’m going to go ahead and do this tutorial in Premier. If you’re looking for other tutorials in other software, go ahead and leave a comment below and we’ll go ahead and make those tutorials for you. Just to let you know, Final Cut Steph, the other half of Rampant, she’s doing a bunch of tutorials in Final Cut Pro right now. We’re kind of tag-teaming these effects and showing you in as many editors as we can, as quickly as we can.
All right, a quick back story on this particular effects library. I’ve been a visual effects artist for almost 20 years now, and a big percentage of my job is adding stank to a video. I know that sounds funny. My non-corporate clients are always saying, “I need you stank-ify this. I need you to drop some stank on it.” My corporate clients are like, “Well, I’d like you to punch this video up 20%.” Whatever. A lot of the editors that I work with too, as motion graphics guy, or a visual effects guy for them, they’re constantly saying, “Here’s my timeline, as a singular QuickTime movie, go ahead and and some style to it.” That’s great, the problem is, with budgets and time constraints, it was becoming more and more difficult to fulfill the needs of my clients, and my fellow editors, so I created this library. I figured, “Well, if I can duplicate the effects you’re looking for, and give it to you in a way that you can use it very quickly, then there’s really no reason for you to have to wait for my time and availability.”
I went ahead, and I shot this library in 5K, 4K, and 2K. I’ve got 350 clips, and it’s all real, it was in our studio. It’s designed to help add punch to your motion graphics, and any kind of video project that you can possibly think of. I spent a couple years working for an in-house add agency for the National Guard. One of the main kinds of videos where called Hooah videos, and these are hard hitting, in your face, military videos. They loved [00:04:00] flashiness, and it was transitions as was to punch up the video, it’s just grit. I created a library for the editor who are working on that so they can drag and drop grit, and hard hitting effects. That’s basically what this is. This is a drag and drop, hard hitting library. If you’re doing any kind of music videos or anything that needs punch. This is the library for you.
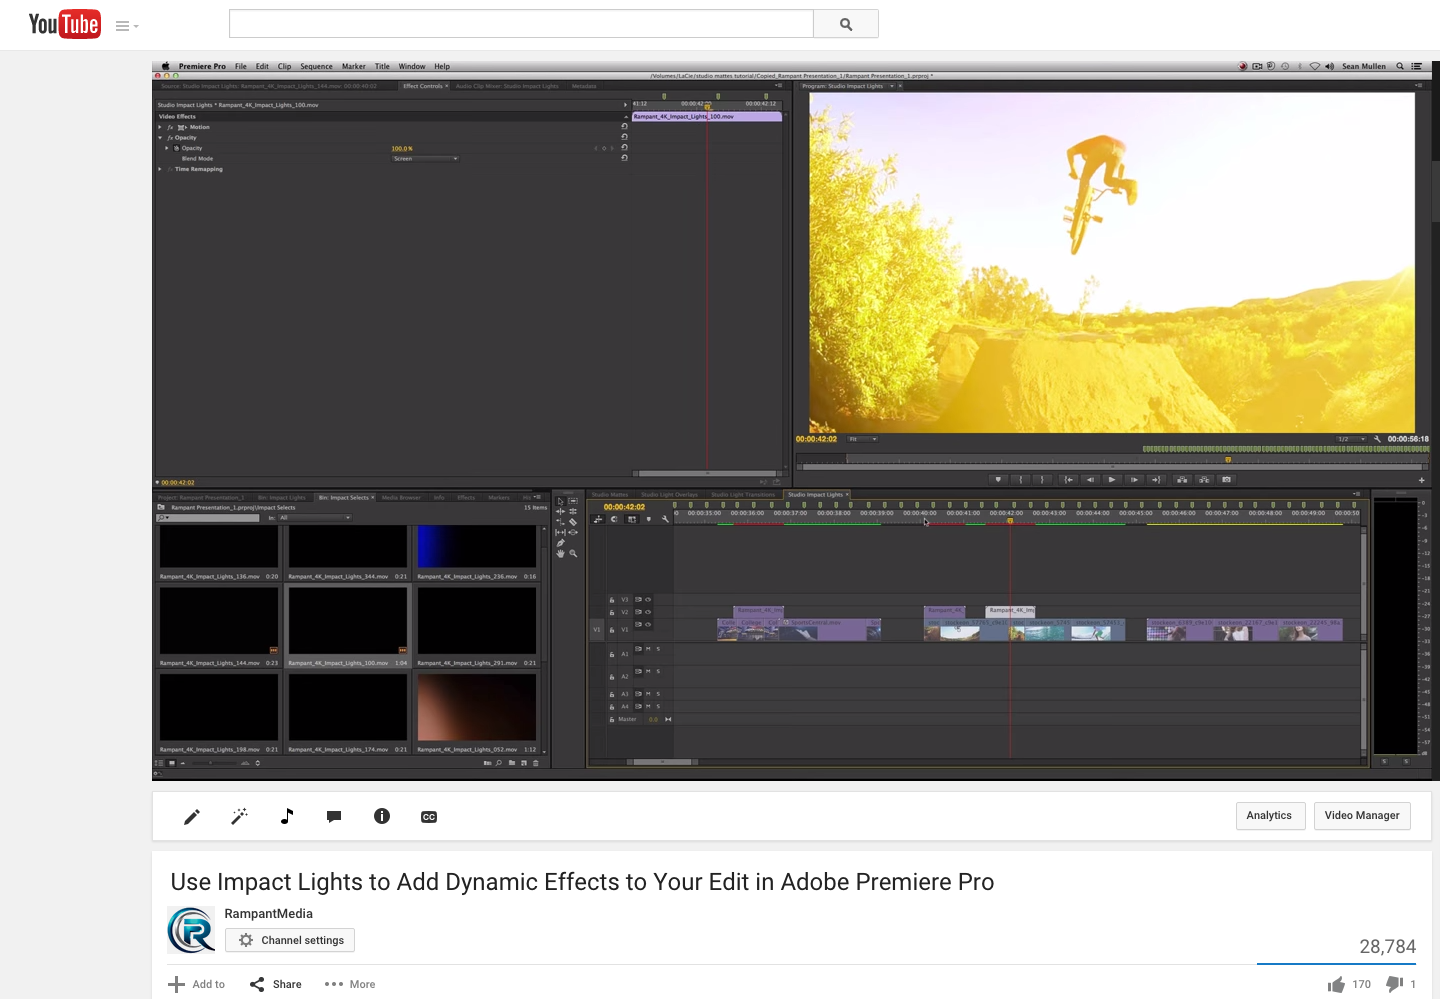
All right, let’s go ahead and start at the beginning here. I’ll just walk you through how these effects work. They’re super, super easy to use. Let’s take a look at this sequence here. I’ve got a quick sports sequence, got lots of flashes, lot of transitions, lot of hard hitting color, right? Cool. No problem. Let’s go ahead and go to the same sequence, but without any effects on it. All right, so I’ve got a BMX guy, and I’ve got a surfer, and it’s a pretty cool little cut here, but it needs something. The footage is a little bit gritty, it’s, you know, it just needs some punch. Speed ramping is great, but you know the director wants more.
Okay, so what do we do? Well, let’s just go over here, and just go through any of our 350 clips. There just all different colors, and shapes, and different dynamic effects, and levels of punchiness, if that’s a thing. I tried my best to create as many different varieties as I could to give you the opportunity to use these on any particular shot that needed it. I have already taken the liberty of pulling some selects here. Let’s start here. I’m going to go ahead and use this clip right here. It’s a lot of fun. You just see it, just it comes up from the bottom, and it’s just pretty amazing. We’ll go ahead and drag this over my clip, like so. Now, all these clips are in 4K. You can get [00:06:00] them in 2K, 4K, or 5K. I’m using the 4K library.
Like I said, you’ve got a bunch of clips you can use for free, just grab them in the download link in the description. Here’s an issue though, what’s going on here? I’ve got the color, it looks great, but it’s … I can’t see my video. Well, two things: one, this is 4K, so it’s much larger than my 1080P timeline, I can keep this as is, if I like the way it looks, or I can shrink it down. That’s the beauty of working in 4K. For simplicity’s sake, I’m just going to go ahead and right click and hit “scale to frame size”. Now I still can’t see anything, so I’ll double click on the element, go to “effects controls”, twirl down the “opacity” tab, and pull the blend mode from “normal” to “screen”. Now, before I let go, all of these blend modes are awesome, and they can all be utilized in one way or another. Take the time to experiment. You’re going to find some really cool, and great effects.
The easiest one to start with is always going to be “screen”, you can also use “linear dodge” or “add”. If you’re working in broadcast, be very careful about “add”, this could get you clipping, and get you in to legal color. I’m going to go ahead and stick with “screen”. If I roll back here, see, you’ve got this real great burn effect. It adds a lot. Cool, cool. Let’s just keep this going. Let’s add a few more clips to this scene here. Let’s see what one. That’s cool. Let’s try this bad boy here. Now, I’m going to keep running into the same issue, where I … it’s not an issue, but I’m going to keep running into the same thing, where I’m going to constantly have to double click and change the blend mode in order to see my video. Instead of having to do that time and time again, I can go back to my original clip that I worked on, highlight “opacity” and hit copy.
Now if I just hit paste on the new clip, it’s going to automatically apply that same blend mode to that clip. I love how that effect pops just as the speed ramp kicks in. It really adds to the scene. [00:08:00] You have one clip, and two clips. See, as you … You can have a lot of fun stacking these and rearranging the timing, just changing the color and the size. You can have a lot of fun adding punch to these videos and not really spend much time. It doesn’t take a lot of effort to do this. All right, so let’s add a couple more clips, just have some fun and finish this thing out.
I like this color here, this is a great purple and blue kind of effect. It kind of matches the tonality of this shot. I’m going to go ahead and use that, and throw it here for fun, hit paste so I can copy my blend mode. Let’s see what happens there. Ooh, that’s kind of neat. Let’s go ahead and use this as a transition. That’s the other great thing about this, is it’s not just flashes and light effects, you can use these as transitions. Go ahead and hit “S” for snapping and turn snapping off. Yea. Check that out. That’s a really great way of creating a nice poppy transition. Boom. Nice.
Let’s add one more to it here. Let’s see what I want. That’s pretty cool. Let’s do a golden one here. Now again, I’m going to go ahead and scale this frame size. Nice. See where that thing comes from the right to the left, that light? I’m going to go ahead and I’m going to adjust the timing of that, so it happens the scene ends. I can probably go a couple of frames this way. Nice. See how it just wipes the shot right off the frame. Wah. Nice. That’s the kind of thing that I created this for. It’s all organic, it can be sped up, it can be re-sized. You can start stacking different ones on here if you’re saying, “Well, there’s this little pause here, this little blank spot. I just want to add something else.” Feel free. Have a party. That’s the great thing about this stuff.
[00:10:00] Let’s mix and match it here. Let’s go ahead and get this side light here, right on top. Apply a paste for the blend mode, scale to frame size, let’s see what happens. Yeah. See? Now you’ve got all these cool light effects happening simultaneously, and it adds really great effect to the scene. Right no. All right, let’s go over here to these motion graphics. I get asked a lot to spice up motion graphics. Now, check this out. You’ve got this really cool render, and whether it was done in Cinema 4D, or After Effects it doesn’t matter. The point is, when something like this is delivered, odds are you’re not going to have the time to go back and make any changes.
You get this cool edit, and it’s cool, but it needs something. Of course, I’ll speed ramp animations when necessary, but sometimes speed ramping’s not just enough. You see, it’s this cool little edit, but it needs something more. It needs some more pop, like maybe the director says these flares aren’t enough, they’re just not popping enough. What can you do? Well, let’s trust our Impact Lights here to dress things up. These are all really cool. Let’s try this one. I’m going to go ahead and shrink this one down again, just like last time. Yeah, that’s kind of neat. Subtle, yet effective. Once again, just like before, I’m going to go ahead and hit paste, so I don’t have to change the blend mode again. See? That’s kind of neat. I like that.
What if I want something right here? Let’s find a clip here that works for us. I really like that as a transitionary piece. Yeah, let’s just do that. Nice. See as you’re scrolling through? Boom, it adds a little bit of flishy, flashy [00:12:00] during the cut, really, really adds some pop to the edit. As you can see, it’s real, real simple to stylize this footage, just by dragging and dropping from your bin to a timeline. I’m going to quickly just go over some of these other effects real quick too. It’s all the same. Once you’ve done it once, you can do it a thousand times. We’ve got this cool shot of the bass player and a lead singer here from a music video. Again, just find a clip that you like, and it doesn’t matter, these all work really well. They were designed to be used in any situation.
Here’s a cool little flash transition. Wam. Of course, that’s at 4K, so I can shrink it down to see if I get a little bit more of an effect here. Nice. Wah. This is a great thing to do if you have a client based, or a supervised session, where you’ve got someone who is sitting behind you, and you’re working in a supervised session. That way, you can drag this on instantly, and go, “What do you think about that?” “Oh, I like that.” “Well, how about this other thing?” “All right, well let’s try to add this other thing real quick.” Scale to frame size, we’ll hit paste and be like, “Check this out, Mr. Client, or Mrs. Client. What do you think?” “Oh, that’s cool, but it’s not the right thing I’m looking for.” Okay, cool.
You have time to play and it doesn’t really cost you any render time, it doesn’t really cost you … You’re not playing with sliders, you not trying to figure something out. You’re not constantly making adjustments. It’s real quick, and real simple. Go ahead and hit paste. That’s probably not the right color scheme for this particular effect, but still very cool, you know. Let’s find something more hard hitting for this guy. Yeah, here we go. That’s pretty cool. Yeah, see? There you go, or you can put that over the bass player. Wah, wah, wah, wah. Yeah, see? You can instantly change the feel.
Let’s go to something a little less aggressive. I do [00:14:00] a lot of work with fashion style videos, a lot of modern style videos. They still want something else, they still want some color and some pop. There’s no reason why you can’t add these types of effects to more modern videos without being so aggressive. That’s why we created some of these with a little more purples and greens, and not necessarily as fast or hard hitting. We’ll go ahead and scale to frame size and hit paste. See? Very cool. Let’s go ahead and use that as transition instead, slide it back. Pretty neat. I can play with this all day long, you get the point. This is just all the same, constantly over and over again. I’m just trying to show you how easy things are to use, and how quick they are to implement.
Let’s go ahead and scale to frame size, hit paste. Boom, they’re great as textures and they’re also great as transitions. If I don’t want to use that as a transition, just slide it into the middle of a shot. You just add spice, especially if there’s a limited camera movement, or whatever. Really, really easy to use. Of course, one last thing I’m going to show you, is on an action scene. I did a lot of this stuff for the National Guard, and for the Marines. Same kind of thing, I mean, you just find the effect that works best for you. I like this edge light effect. I’m going to go ahead and scale it down to frame size, I’m going to hit paste. That’s very cool.
I’m going to use that on this one, here. Yeah. See, these work really well when you time them with speed ramps, they really accentuate the speed ramp without taking away from it. That’s a great edge light, let’s add a little bit more color to it. Let’s find something else here. Yeah, this one’s cool. Hit paste. The great thing is you can just keep sliding around [00:16:00] until you find the right place for you. You can also use them as transitions we’ve always discussed.
Anyway, as you can see, these are super, super simple to use. Without me yapping on and on, it takes you about 2 seconds to drag a clip from your bin to your timeline, change the blend mode, and you’re good to go. That’s about it. Thanks for watching. If you have any comments, questions, or tutorial requests, hit us up on Twitter @RampantDesign, or check us out on Facebook at facebook.com/rampantmedia. Of course, you can find more tutorials at rampantdesigntools.com. Until next time, I’m Sean Mullen for Rampant Design. Thanks for watching.
[/toggle]
